Thursday, January 26, 2012

Create Custom Service Application in SharePoint 2010

Create Visual Studio Solution
In Visual Studio 2010, create a new project using the “Empty SharePoint Project” and call it “HelloServiceApplication”.
You will be asked for the SharePoint site address for debugging. Since we are deploying this to the central administration site, enter the URL of Central Administration site and check the “Deploy as a farm solution” radio button. Click “Finish” to continue.
We will change the assembly name and default namespace to “SharePointEgg”. Right click the “HelloServiceApplication” and select “Properties”. Under the “Application” tab, change both the “Assembly name” and “Default namespace” to “SharePointEgg”. Save the settings.
Add a reference to the following assembly:
  • System.ServiceModel
  • Microsoft.SharePoint
  • Microsoft.Office.Server
  • Microsoft.Office.Server.UI
  • System.Web.DataVisualization
Create WCF Contract and Service Host Declaration
We start this by adding a mapped folder to the WebServices folder in {SharePointRoot}. To do this, right click the HelloServiceApplication > Add > SharePoint Mapped Folder..., then select the “WebServices” folder and click “OK”. A new WebService folder “HelloServiceApplication” will be added to the project.
Let’s add a contract file that has a single signature “Hello”. Right click the WebServices/HelloServiceApplication folder and add a new item. Select the “WCF Service” project template and give it a name called HelloService.
Open IHelloService.cs and declare a signature “Hello”.
using System;
using System.Collections.Generic;
using System.Linq;
using System.Runtime.Serialization;
using System.ServiceModel;
using System.Text;

namespace SharePointEgg.WebServices.HelloServiceApplication
{
    [ServiceContract]
    public interface IHelloService
    {
        [OperationContract]
        string Hello(string name);
    }
}
Next we will add a service host declaration. Add a text file type in the WebServices\HelloServiceApplication folder and rename it to “Service.svc”. Open the svc file and enter the following declarative:
<%@ServiceHost language="C#" Debug="true" Service="SharePointEgg.HelloServiceApplication, SharePointEgg, Version=1.0.0.0, Culture=neutral, PublicKeyToken=c6000eb8b348f36b" %>
Note that you need to enter your own public key token.
We will add a configuration file to our WCF service that contains the information such as the behaviour. Right click WebServices\HelloServiceApplication folder again and this time we will add an application configuration file called “web.config”. Enter the following xml to the newly added file:
<?xml version="1.0" encoding="utf-8" ?>
<configuration>
  <system.serviceModel>
    <services>
      <service behaviorConfiguration="TestBehaviour" name="Hello Service Application">
        <endpoint address="" binding="webHttpBinding" bindingConfiguration="" contract="SharePointEgg.WebServices.HelloServiceApplication.IHelloService" />
      </service>
    </services>
    <behaviors>
      <serviceBehaviors>
        <behavior name="TestBehaviour">
          <serviceMetadata httpGetEnabled="true" />
        </behavior>
      </serviceBehaviors>
    </behaviors>
  </system.serviceModel>
  <system.webServer>
    <security>
      <authentication>
        <anonymousAuthentication enabled="true" />
        <windowsAuthentication enabled="false" />
      </authentication>
    </security>
  </system.webServer>
</configuration>
Delete HelloService.cs as we don’t need it. Also delete the app.config added to the base project.
We have successfully completed a simple WCF service that is ready to deploy to a SharePoint farm

Wednesday, January 25, 2012

SPLongOperation - SharePoint Spin Wheel

I have used this class on various occasions when needing to programmatically create sites and modify properties to various object.  In the following example I have a custom Web Part that has a button on it to create a site where I need perform some custom actions.

        void _createButton_Click(object sender, EventArgs e)
        {
            using (SPLongOperation operation = new SPLongOperation(this.Page))
            {
                operation.LeadingHTML = "Creating Site";
                operation.TrailingHTML = "Please wait while the project site is being created for " + siteTitle;
                operation.Begin();

                SPWeb sub = currentWeb.Webs.Add(siteAbbrev, siteTitle, siteDesc, 1033, "STS#0", false, false);

                // Do the rest of my code . . .
               
                operation.End(sub.Url);
            }
        }

How the SPLongOperation works is you create a new object of type SPLongOperation then you can change the wording that will be displayed on the screen while the process is running by modifying the LeadingHTML and TrailingHTML properties.  After you have everything ready just kick off the operation using the Begin method.  Once you are in the Begin method, every piece of code you write all happens behind the spin wheel.  And once your code has completed, call the End method and you pass a URL that the user will be re-directed to once your code has completed.  Here is an example page of what it looks like when calling the SPLongOperation class to wrap your code around

Tuesday, January 24, 2012

Using Managed Metadata in SharePoint sites created from the blank site template

When you create a site from the Blank Site template and then attempt to add a list column of type Managed Metadata you are confronted by a message stating, “The required feature is not enabled for this column type.” If you try to save you are also informed that “The Taxonomy feature (Feature ID “73EF14B1-13A9-416b-A9B5-ECECA2B0604C”) has not been activated.
A term set or anchor point was not selected”

So clearly a prerequisite Feature has not been activated. So what feature is this? Would have been nice for the message to be a little friendlier! Using our old friend PowerShell we can execute the following cmdlet to find out.
Activating the Taxonomy Feature using Power Shell:
  1. GO to Start menu.
  2. Go to SharePoint 2010 Management Shell and select Run as Administrator.
  3. In the command prompt, type each of the following commands.

    Enable-SPFeature -id 73EF14B1-13A9-416b-A9B5-ECECA2B0604C -URL http://<Server>
  4. <Server>- is the SharePoint server name.
  5. Now you have activated the Taxonomy Feature.
Activating the Taxonomy Feature using STSADM command:
  1. GO to Start menu.
  2. Go to SharePoint 2010 Management Shell and select Run as Administrator.
  3. In the command prompt, type each of the following commands.

    STSADM -o activatefeature -id 73EF14B1-13A9-416b-A9B5-ECECA2B0604C -url http://< Server > -force
  4. <Server>- is the SharePoint server name.
  5. Now you have activated the Taxonomy Feature.


Monday, January 16, 2012

Creating and Deploying Custom aspx Page as Feature and Solution Package

There are two ways to deploy a custom aspx page in SharePoint.

1. Using VseWss extensions project. Here you won't need to create a solution package manually. All the files need to create a solution package are created by the VS extensions itself. See the related Post Deploy Custom Css file in 12 hive. You can use same method to deploy your Custom aspx page.

2. The second way is creating a solution package around your asp.net webapplication so that the pages in the webapplictaion can be deployed in sharepoint. This requires you to manually create all the solution related files (I mean manifest.xml, feature.xml, elements.xml and .ddf file).


In this Post, we will create a solution package manually for a asp.net webapplication project, so that the custom aspx page created in asp.net web application can be deployed in SharePoint's Layouts folder.

Below are the Steps that you can follow :

1. Create a New WebApplication Project.

2. Create a new folder "MyCustomFolder" in the solution explorer and Add your custom aspx page (along with cs file) under it.

3. Add two more xml files in the same folder with names as elements.xml and feature.xml.

The Elements.xml File should look like below -

<elements xmlns="<a href=">http://schemas.microsoft.com/sharepoint/">
<module name="Pages" url="_layouts">
<file url="CustomPage.aspx" name="CustomPage.aspx" type="GhostableInLibrary"> </file>
</module>
</elements>
</div>

Note : Add Module name as “Pages” and url as ” _Layouts “


The Feature.xml File should look like below -

<feature id="79DD53E7-8719-45b0-8E25-C2450B3E3F14" title="Project.CustomPage" description="Custom Page" scope="Web" version="1.0.0.0" hidden="false" xmlns="http://schemas.microsoft/sharepoint/">
<elementmanifests>
<elementmanifest location="elements.xml">
<elementfile location="CustomPage.aspx"> </elementfile> </elementmanifest>
</elementmanifests>
</feature></div>


4. Now, Create another xml file in the Project and name it as manifest.xml

The manifest.xml should look like below -

<solution xmlns="<a href=">http://schemas.microsoft.com/sharepoint/" SolutionId="A5A9C1C2-4EBF-40db-935F-66085A9E0BE8">
<rootfiles>
<rootfile location="TEMPLATE\LAYOUTS\MyCustomFolder\CustomPage.aspx">
</rootfile>
<assemblies>
<assembly deploymenttarget="GlobalAssemblyCache" location="Project.CustomPage.dll">
<safecontrols>
<safecontrol assembly="Project.CustomPage Version=1.0.0.0, Culture=neutral, PublicKeyToken=a28586c97e90b41f" namespace=" Project.CustomPage" typename="*" safe="True"> </safecontrol>
</safecontrols>
</assembly>
</assemblies>
</rootfiles>
</solution>

Note : If you are using some code behind with your aspx page, then change the Inherit tag in the aspx page to inherit from the assembly of the project.

For e.g. change the tag to

Inherits="NameSpace.Class, NameSpace, Version=1.0.0.0, Culture=neutral, PublicKeyToken=2ef8d0c4bab8980b" Debug="true"

You dont need to deploy .cs file with the Project. The code is accessed via its .dll .

5. Finally Create the .ddf file ( its simply a text file with name as .ddf)

.ddf file would be something like below -

.OPTION Explicit ; Generate errors.Set CompressionType=MSZIP

.Set UniqueFiles=Off.Set

DiskDirectory1=Package

.Set CabinetNameTemplate=Project.CustomPage.wsp

manifest.xml

bin\ Project.CustomPage.dll

.Set DestinationDir=TEMPLATE\LAYOUTS\CustomPage.aspx

;sets the feature directory.

Set DestinationDir=CustomPageFolder

;adds the feature to the feature directory

MyCustomFolder\feature.xml

;adds the element to the feature

MyCustomFolder\elements.xml

I have created an empty folder in the Project with a name as “Package” to save the .wsp file in it.


6. Sign the project with a key (Project Properties -> "signing tab" and browse your .snk key) and Build the Project.

7. Now, Add and deploy the .wsp solution which is under Package Folder in SharePoint using stsadm commands.

Create and deploy Event Receiver Feature and Solution package

Here is a Step-by-Step description of how to create an Item event receiver as a feature and then creating a solution package for it. I this code we will be creating an event receiver for document library types templates where we will assign a value to a custom field called "Location" on adding of a document.

Remember - document added is ItemAdded and if we need to assign any value to document properties ( like Title, File Type etc.) we need to use ItemUpdating.

So lets start.

1. Create a new asp.net Webapplication project and name it as "myEventReceiver".

2. Add Refernces to Microsoft.Sahrepoint.dll in the Project.

3. Create the below two folders in your project

a. ItemEventreceiver

b. Package

4. Add the below three files in the ItemEventreceiver folder (created in step 3)

a. Add a xml file and name it as elements.xml
b. Add a xml file and name it as feature.xml
c. Add a class file and name it as EventReceive.cs

5. Now add another xml file in the project (not in the ItemEventreceiver folder) and name it as manifest.xml.

6. Lastly, add the below two text type files in your project

a. mysolution.ddf
b. mypackage.bat

7. Sign the Project. Generate a key pair using sn.exe tool and save it to your local machine. Now go to Project Properties and in signing tab browse for this key.
Build the Project and get the full name of the dll or assembly from the reflector.

Now lets add some code in these files

EventReceive.cs -

using System;
using System.Collections.Generic;
using System.Linq;
using System.Web;
using Microsoft.SharePoint;


namespace EventReceivernamespace
{
public class EventReceiver : SPItemEventReceiver
{

public override void ItemUpdated(SPItemEventProperties properties)
{

SPItem oItem = properties.ListItem;

oItem["Location"] = "New Jersey";

this.DisableEventFiriing();

oItem.SystemUpdate(false);

this.EnableEventFiring();

}
}
}


elements.xml


<?xml version="1.0" encoding="utf-8" ?>
<Elements Id="sfb3c25c-f311-4dd3-86de-29904210c7d5" xmlns="http://schemas.microsoft.com/sharepoint/">
<Receivers ListTemplateId="101">
<Receiver>
<Name>ItemUpdated</Name>
<Type>ItemUpdated</Type>
<SequenceNumber>2000</SequenceNumber>
<Assembly>myEventReceiver, Version=1.0.0.0, Culture=neutral, PublicKeyToken=9275960caf741af9</Assembly>
<Class>EventReceivernamespace.EventReceiver</Class>
</Receiver>
</Receivers>
</Elements>


Use the fully qualified name of the assembly for this project in your assembly tag.

fetaure.xml

<?xml version="1.0" encoding="utf-8" ?>
<Feature Id="2e4d1d48-589e-4328-8a24-a554b2cdcbad"
Title="mycustomImageReceiverFeature"
Scope="Web"
Version="1.0.0.0"
Hidden="FALSE"
DefaultResourceFile="core"
xmlns="http://schemas.microsoft.com/sharepoint/">
<ElementManifests>
<ElementManifest Location="elements.xml" />
</ElementManifests>
</Feature>


manifest.xml


<?xml version="1.0" encoding="utf-8" ?>
<Solution SolutionId="d7f69035-e74c-44f2-aaa8-928418f6ead0" xmlns="http://schemas.microsoft.com/sharepoint/">
<FeatureManifests>
<FeatureManifest Location="ItemEventreceiver\feature.xml" />
</FeatureManifests>
<Assemblies>
<Assembly Location="myEventReceiver.dll" DeploymentTarget="GlobalAssemblyCache">
<SafeControls>
<SafeControl Assembly ="myEventReceiver, Version=1.0.0.0, Culture=neutral, PublicKeyToken=9275960caf741af9"
Namespace ="EventReceivernamespace" TypeName ="*" />
</SafeControls>
</Assembly >
</Assemblies>
</Solution>


mysolution.ddf -

.OPTION EXPLICIT ; Generate errors
.Set CabinetNameTemplate=mycustomEventReceiver.wsp -> .wsp name
.set DiskDirectoryTemplate=CDROM ; All cabinets go in a single directory
.Set CompressionType=MSZIP ;** All files are compressed in cabinet files
.Set UniqueFiles="OFF"
.Set Cabinet=on
.Set DiskDirectory1=Package

;adds manifest file
manifest.xml

;adds webpart dll
bin\myEventReceiver.dll


;sets the title webpart feature directory
.Set DestinationDir=ItemEventreceiver

;adds the feature manifest to the feature directory
ItemEventreceiver\feature.xml

;adds the element manifest to the feature directory
ItemEventreceiver\elements.xml


Optional
mypackage.bat - This file will create the soltuion package for you and will place it in the Package folder ( that you created in step 3) on build of your project. In addition to that this will also drop the .wsp file in 12 hive's BIN folder (Make sure you have Permissions to drop the .wsp in BIn directory).


@SET MakeCabTool=makecab.exe
@SET WSP=mycustomEventReceiver
@SET DESTDIR="C:\Program Files\Common Files\Microsoft Shared\web server extensions\12\BIN"
@SET SPAdminTool=%CommonProgramFiles%\Microsoft Shared\web server extensions\12\BIN\stsadm.exe

if EXIST Package\%WSP%.wsp del Package\%WSP%.wsp
"%MakeCabTool%" /f mysolution.ddf /D CabinetNameTemplate=Package\%WSP%.wsp

if EXIST Package\%WSP%.cab del Package\%WSP%.cab
"%MakeCabTool%" /f mysolution.ddf /D CabinetNameTemplate=Package\%WSP%.cab

XCOPY /r /y Package\*.wsp %DESTDIR%

Lastly, Edit the Project Properties and under Build Events in "Post Build event command line" box write the below

CD $(ProjectDir)
mypackage.bat

Now build the Project. You should see the mycustomEventReceiver.wsp in your package folder and in SharePoint's BIN directory as well

Now add your solution in sharepoint solution store via stsadm and deploy it.

To do this,

Open the stsadm.exe (from 12 hive bin) and type the below command

stsadm -o addsolution -filename mycustomEventReceiver.wsp

Now got to Cental admin -> Operations-> solution management and click on mycustomEventReceiver.wsp. Click on Deploy and choose one of the web applications that you want to deploy the feature on.

Lastly, Browse to that web application -< Site Settings -< Site features and activate the feature.

To Test -

1. Create a custom document library and create a column "Location" in it.
2. Now upload the document.
3. Once your done uploading and adding properties like Title and stuff for the document you will see the Location column populated with the value "New Jersey"

Adding and Deploying a User Control in a WebPart

Here we will add an existing User Control as a part of our WebPart Soultion package (that we created using VSeWSS webpart template), so that the control gets deployed in _controltemplates folder along with the solution deployment proccess.

Also, we will add the .dll of UserControl in GAC via our manifest.xml file.

To add an Existing User Control in a WebPart, Created using VseWss, see the instructions below.
Note : We will deploy our User Control in _controlsTemplate and will load it dynamically in the webpart.

Creating User Control:

1. Create a user control in a Web application project.
2. Sign the project assembly.

Creating a WebPart Project.

1. Create a new WebPart Project. ( You need Vsewss Installed for this).

2. Write the below code. The CreateChildControls here will load the User control from _Controltemplates ( the location where we will deploy our control) when the webpart renders.

Webpart Code :


namespace PVH.PhoneDirectory.WebPart
{

[Guid("48ef83e6-440b-4465-8401-2852ea3fb8b1")]

public class PhoneDirectorySearchWebPart : System.Web.UI.WebControls.WebParts.WebPart
{

UserControl userControl;

public PhoneDirectorySearchWebPart()
{

this.ExportMode = WebPartExportMode.All;

}

public override string Title
{
get
{
return "WebPart With Control";
}
set
{
base.Title = value;
}
}

protected override void Render(HtmlTextWriter writer)
{
userControl.RenderControl(writer);
}

protected override void CreateChildControls()
{

base.CreateChildControls();

userControl = (UserControl)Page.LoadControl(@"/_controltemplates/CustomWebPart /UserControl.ascx");

this.Controls.Add(userControl);

}}}

3. Now, create a Templates folder struture in your webpart. The structure would be
Templates->ControlTempates->CustomWebPart.

4. Add your control (.ascx file) and your controls .dll (the signed assembly of the Web application project) under CustomWebPart Folder, so that It gets deployed in controls Folder.


Note : Please note that we have not added the code file for the control in the Custom WebPart's Folder.


5. Now before building and deploying this solution, Lets change the ascx file of the control to Inherit from the .dll of the Control. This will allow your ascx file to access the code file of the control from .dll itself.

The Changes are :


<%@ Control Language="C#" AutoEventWireup="true" Inherits="ControlNameSpace.ControlClass, ControlNameSpace, Version=1.0.0.0, Culture=neutral, PublicKeyToken=2ef8d0c4bab8980b" Debug="true" %>

If you want to deploy other files(like Css or js) along with your webpart, you can do it by craeting the same directory stucture as we created for _controlstemplate
See example :
Adding .css or .js files in 12 hive

6. Finally, we need to add the User Control's .dll into GAC and also, add an entry for our User control into the SafeControls.

So, Open the manifest file and add another assembly under Assemblies tag. Also, Add a Safe Control entry below that.(see the Image Below)

Note : The Location for the controls .dll is from our webParts Template Structure.


Now Build the Project and Deploy the Soulton.

You will see that your manifest.xml file will have the entries for our control under Template tag.

Deploy Webpart as Solution Package and Feature

In this example we will create a SharePoint WebPart using VseWss, which will display data from a SharePoint list in a gridview control. After creating the webpart we will deploy the solution file i.e. .wsp file in our SharePoint site using stsadm.

OutPut :


To begin with you need to install the Visual studio extensions for Windows SharePoint Services 3.0 (VseWss) for your appropriate Visual Studio version. You can download the latest one from Here.

Next thing that you have to keep in mind is that you are developing this solution on the server or machine which has WSS 3.0 installed in it.

Lastly, a Cutsom list named "Clients" should exist in your SharePoint site. Since I am using a Custom list called "Clients" and also a Custom column "Clients" in that list in my webpart.

Lets begin with the steps

1. Create a SharePoint WebPart Project. See the Screen below.


2. Now in your soluiotn explorer you would see a folder named "WebPart1". Letse just rename it to "MyCustomWebPart". Make sure you also rename all the files in the folder. Also, don't forget to change the url path in MyCustomWebPart.xml. So, we have somthing like below .


3. Now lets write some code in our MyCustomWebPart.cs . In this webpart we will create a Gridview control and will bind it to one of the columns in the SharePoint list. We have also used RunWithElevatedPrivileges so that the code runs under Application Pools identity and should not cause errors for the end users. The list we have used is called "Clients" and the Column in the list is also called "Clients".

Code :

namespace MyCustomWebPart
{
[Guid("f66be37b-91f9-4e99-97dc-0e30f6eb44ff")]
public class MyCustomWebPart : System.Web.UI.WebControls.WebParts.WebPart
{
GridView myGrid;

public MyCustomWebPart()
{
}

protected override void CreateChildControls()
{
SPDataSource SPDataSource1 = new SPDataSource();
try
{
SPSite mySite = SPContext.Current.Site;
SPWeb myWeb = mySite.OpenWeb();
//Using RunWithElevatedPrivileges

SPSecurity.RunWithElevatedPrivileges(delegate()
{
using (SPSite siteCollection = new SPSite(mySite.ID))
{
using (SPWeb web = siteCollection.OpenWeb(myWeb.ID))
{
myGrid = new GridView();
myGrid.AutoGenerateColumns = false;

BoundField ClientName = new BoundField();
ClientName.HeaderText = "Our Clients";
ClientName.DataField = "Clients";
myGrid.Columns.Add(ClientName);

SPList List = myWeb.Lists["Clients"];
SPDataSource1.List = List;


myGrid.DataSource = SPDataSource1;
myGrid.DataBind();

Controls.Add(myGrid);

base.CreateChildControls();
}
}
});
}
catch { }
}
}
}

In above Code we have also used SPDatasource which will define the Source for Gridview control as SharePoint list.

Now lets just build the project. Please Note that building the project will not create a .wsp or solution package . To create a Solution file or .wsp file we will have to virtually Deploy the project. So, to do that just right click on the Project "MyCustomWebPart" and click on Depoly. See the screen below.


You will likely get an error at this point. Since, we have not specified the deployment target. Just ignore the error and grab the .wsp file. To see awhat all files are created click on "Show all Files" button on top the solution explorer.


Now you will see your .wsp file along with files like feature.xml and manifest.xml files.


Deployment : At this point we have two options for deploying this wsp or solution package in our sharePoint site.

1. Deploy using Visual Studio - This is quick and easy deployment. Just right click on you project and goto Properties. Goto the "Debug" tab and enter you SharePoint site's url . Save it and again hit the Deploy button. See the screen below.


2. We will deploy the wsp file using stsadm . To do this open a command prompt and navigate to the below path
C:\Program Files\Common Files\Microsoft Shared\web server extensions\12\BIN.

Open this path in your windows explorer and drap and drop your wsp in here. See Screen below.


Lets write the command to deploy the webpart.


In this case you will just add the solution package in SharePoint's Solution store. You would then need to goto CentralAdmin->Operations->Solution Management and deploy the webpart. Just click on the webpart title in Solution management screen and you will see the below. Click on Deploy Solution and Choose the webapplictaion.


After you deploy : After yo deploy the webpart you will need to add it into webpart gallery. To do this Open your site and goto "SiteActions->Site Settings ->Modify All Site Settings ->WebParts. Click on New and select the webpart from the Screen. See below


Now you are all set to add the webpart in your webpart page.

Business Data Catalog (BDC) VS Business Connectivity Services (BCS)

What is Business Connectivity Services in SharePoint ?

SharePoint 2010 provides a new set of technologies known as Business Connectivity Services for retrieving, editing, updating, and deleting data from external systems(for e.g. data from ERP or CRM database). BCS enhances the SharePoint platform’s capabilities with out-of-box features, services and tools that streamline development of solutions with deep integration of external data and services.


How is BCS Different from BDC in SharePoint 2007 ?

Even though the BDC made it relatively easy to create read-only solutions that display data in the Business Data List Web Part, it was not so simple to create a solution that enabled users to make changes and write that data back to the external store.

BCS, on the other hand, provides you with Read-Write capable connectivity from Client and Server to Database, WCF/Web Services and .Net Sources.

A Developer can now use SharePoint Designer 2010 and VS 2010 rapid development tools to access external data. For e.g. you can now create read-write connections to external database from SharePoint designer and then can create webpart\other solutions to surface that data.

The BCS data can further be used in other SharePoint Fetaures such as Business Intelligence,Collaboration and in Enterprise Search.

Referential integrity implemented by Lookup columns in SharePoint 2010

The new added enhancements in CAML and SPquery are :

1. <Joins> element in CAML and the SPQuery.Joins property
2. <ProjectedFields> element in CAML and the SPQuery.ProjectedFields.

Joins - Joins in SharePoint are driven off of lookup-based columns.
For e.g. if we a have List1 with following column. City being the Lookup column.
Name
Address
City <strong>-> Lookup Column</strong>
and List2 with following columns
City
ZipCode
and if we have to access the Zipcode column from List2 along with the name and address from our List1 we will use a Join element in Our CAML to specify the our foreign key column i.e. City and will assign the CAML to SPquery.query property. We will then create the ProjectedFields element for specifying the ZipCode column (the column we need from List2) and assign it to the SPquery.ProjectedFields property.

ProjectedFields -
These are fields in the List2, which you can access using CAML’s ProjectedFields element tag.
Let’s look at an example. In the below query i am trying to retrieve all the items from List1 where name =”isha” and the related zipcode field from the List2.
using (SPSite site = new SPSite(SPsiteUrl))
{
SPWeb web = site.OpenWeb();
SPQuery query = new SPQuery();
query.Query =
@”<Where><Eq>
<FieldRef Name=’Name’ /><Value Type=’Text’>Isha</Value>
</Eq></Where>”
query.Joins =
@”<Join Type=’LEFT’ ListAlias=’List2′>
<Eq>
<FieldRef Name=’City’ RefType=’Id’/>
<FieldRef List=’List2′ Name=’ID’/>
</Eq>
</Join>”;
query.ProjectedFields =
@”<Field
Name=’Zipcode’
Type=’Lookup’
List=’List2’
ShowField=’Zipcode’ />”;
SPListItemCollection items = web.Lists["List1"].GetItems(query);

Export SharePoint List items to Word Document

/Opening the current site
SPSite oSiteCollection = SPContext.Current.Site; 
//Fetching the current list
SPList oList =   oSiteCollection.AllWebs["Site_Name"].Lists["List_Name"];
SPListItemCollection collListItems = oList.Items;
//Creating HttpContext                                           
HttpContext.Current.Response.Clear();
HttpContext.Current.Response.Charset = "";
HttpContext.Current.Response.ContentType = "application/msword";
//File name for the exported word document
string strFileName = "SampleDocument" + ".doc";
HttpContext.Current.Response.AddHeader("Content-Disposition", "inline;filename=" + strFileName);
//Giving heading to the Word Document with style
StringBuilder strHTMLContent = new StringBuilder();
strHTMLContent.Append(" <h1 title='Heading' align='Center' style='font-family:verdana;font-size:80%;color:black'><u> EXPORT TO WORD SAMPLE </u></h1>".ToString());
strHTMLContent.Append("<br>".ToString());
strHTMLContent.Append("<table style=margin-top: 8px; border=1 bordercolor=#808080 frame=hsides rules=rows cellpadding=0 cellspacing=0 width=100%>".ToString());
//Looping through each list item in  the list

foreach (SPListItem oListItem in collListItems)
{
                                                   
            strHTMLContent.Append("<tr><td>" + oListItem["Choice_Field_Name"].ToString() +"</td></tr>");
                                                           
}
strHTMLContent.Append("</table>".ToString());
strHTMLContent.Append("<br><br>".ToString());
HttpContext.Current.Response.Write(strHTMLContent);
HttpContext.Current.Response.End();
HttpContext.Current.Response.Flush();

Programmatically make the SharePoint choice field default value to null

using (SPSite site = newSPSite("http://serverName:1111/sites/sample"))
{
using (SPWeb web = site.RootWeb)
{
SPList list = web.Lists.TryGetList("BugsList"); foreach (SPField field in list.Fields)
{
if (field.Title == "Choice")
{
field.DefaultValue =
null;
field.Update();
}
}
list.Update();
}
}

Friday, January 13, 2012

Updating hyperlink fields programmatically

Data in the Hyperlink Column can be populated / set in the following manners: 
Item[“HyperLinkColumnName”] = “http://www.google.com, Google”;
Item.Update(); 
Don’t forget space after comma. 
Or 
SPFieldUrlValue MyURL = new SPFieldUrlValue();
MyURL.Description = “Google”;
Item[“HyperLinkColumnName”] = MyURL;  

Data from the Hyperlink Column can be get in the following manner: 
SPFieldUrlValue MyURL = new SPFieldUrlValue(Item[“HyperLinkColumnName”].ToString()); 
string URLText = MyURL.Description;
string URL = MyURL.Url; 

Best practices resource for SharePoint developer

SharePoint MSDN Forum


  • Module is the file where you can upload any file content.
  • How to deploy Images files in 14 directory.
  • How to deploy Css files in 14 directory.
  • How to deploy JS files in 14 directory.
  • ISAPI Folder is nothing but API Folder which will have all Dll's.
  • ClientBin will have all XAP files you are using within your site.
  • In 14 bin Log's file will have Co-relation ID's, when error occurs the log file will be created in the Log's file.
  • LCIN Stands for Language Cultural Indentific Number. The LCIN for English is 1033.
  • The Pages which is going to take more time should be placed in Application Pages.
  • Corev4.css is the default style sheet in SharePoint 2010.
  • To overwrite this use to use this tag(<SharePoint:CssRegistration name="Your Custom Css File Path Here" After="Corev4.css" RunAt="Server" />).
  • WebPart Lifecycle.
  • Workflow Lifecycle:- It contains 3 forms namely Initiation form, Association Form, Task Form.
  • What is the difference between Asp.Net WebPart & SharePoint WebPart?
  • What is Threshold limit in SharePoint 2010?
  • What is the use of Threshold Limit in SharePoint while using SpQuery Object?
  • Ajax Version we need to use in SharePoint 2010 was 3.0.30930.
  • Using Ajax Tab Control in SharePoint 2010.
         SharePoint 2010 Object Model is divided into 3 parts namely.
  • Server Object Model
  • Client Object Model
  • WCF Services
        SharePoint 2007 Object Model is divided into 2 parts namely.
  • Server Object Model
  • WebServices
        Secure Store Token.
       The above two are most important for STS.
  • Identity Model.
  • WebServices.


Given below SharePoint discussion forum for various SharePoint related topics this may help SharePoint professional to query or find answer to the issue they face.
SharePoint - Design and Customization
Discussion about site design (i.e. definitions, templates) and page customization (i.e. layouts) as well as SharePoint Designer and similar tools.
SharePoint - Development and Programming
Discussion  about development and programming (i.e. web parts, features, etc.), SDKs, and tools (i.e. Visual Studio).
SharePoint - Enterprise Content Management
Discussion  about document management, records management, and web content management capabilities in SharePoint products and technologies.
SharePoint - Excel Services
Discussion  about Excel Services capabilities in Office SharePoint Server.
SharePoint - InfoPath Forms Services
Discussion  about InfoPath Forms Services capabilities in Office SharePoint Server.
SharePoint - Workflow
Discussion about workflow capabilities in SharePoint products and technologies.
SharePoint - Accessibility
Discussion about improving accessibility and usability for the physically challenged.
SharePoint - Business Data Catalog
Discussion about the Business Data Catalog capabilities in Office SharePoint Server.
SharePoint - Business Intelligence
Discussion  about implementing SharePoint for business intelligence oriented solutions

TechNet Forums

SharePoint - Collaboration
Discussion about team sites, project tracking, document collaboration, extranets, etc.
SharePoint - Community Advancement
Discussion about improving or expanding the worldwide SharePoint community through blogs, forums, social networking, conferences, user groups, code camps, etc.
SharePoint - General Question and Answers and Discussion
Discussion about presales oriented questions and discussions.
SharePoint - Search
Discussion about Search capabilities in SharePoint.
SharePoint - Setup, Upgrade, Administration and Operation
Discussionabout installation/setup and upgrade/migration as well as administration and operation.
SharePoint - Social Computing
Discussion about MySites, blogs, wikis, tagging, social networking, knowledge search and brokering, communities, etc

How to use Calculated value column

This article focus on three SharePoint functionality.
  1. 1.) How to use Calculated value column.
  2. 2.) How to format text using LOWER() and PROPER () functions.
  3. 3.) How to Merge two column value.
Let's begin, We seen from our past experience that, Individual users use to enter data their own style or non-standard format. Since this is part of end users habit, its very difficult to train everyone in the organization.
Given below example shows how end user's entered SharePoint contact list information.
User Data Input
image
SharePoint List View
image
Above scree shots show that the data entered inconsistence way and display in same manner.
Since this known problem in the industry we need to manage these issue.
Let's see how can manage below requirements
  1. 1.) Display eMail Address to lower case,
  2. 2) Merge First and Last name and Display as Full Name.
SharePoint : Go to Contact List and Click Settings and then Click List Settings.
image
Create new column called "FormatedeMailAddress" and click "Calculated" On Formula text box type following formula.
=LOWER (eMailAddress)
image
Save and Go back to Contact List view you can see the email address display on Lower case format.
image
Let us look how to merge two column value "First and Last" as "Full Name" and format text in to proper case.
SharePoint : Go to Contact List and Click Settings and then Click List Settings. Create new column called "Full Name" and click "Calculated" On Formula text box type following formula.
image
=CONCATENATE(PROPER(First)," ",PROPER(Last)) 
Save and Go back to Contact List view you can see the email address display on Lower case format.
image
CONCATENATE () - Joins several text strings into one text string.
PROPER() - Capitalizes the first letter in a text string and any other letters in text that follow any character other than a letter. Converts all other letters to lowercase letters.
LOWER() - Converts all uppercase letters in a text string to lowercase

Setup and Install SharePoint 2007 Server (MOSS) on Virtual PC

This article describes how to Setup and Install SharePoint 2007 Server (MOSS 2007) on Virtual PC
Before you start installing, Make sure that you downloaded following software’s.
  1. 1. .NET Framework 2.0
  2. 2. .NET Framework 3.0
  3. 3. Windows SharePoint Service 3.0
  4. 4. Windows SharePoint Service 3.0 SP 1
  5. 5. Virtual PC 2007 and
  6. 6. Windows Sever 2003 R2.
The following process includes creating a new VM definition, adjusting the settings, and installing the operating system (OS) and .NET Frameworks. (Take note that this process will take about three hours.)
Setup Victual PC
  1. 1. Click New... and Click Next
image
  1. 2. Select Create a new virtual machine. Click Next.
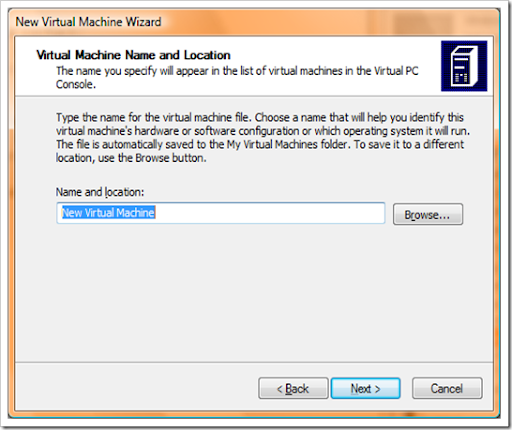
  2. 3. Type the name and location. The default is New Virtual Machine. To create the VM on your external hard drive, enter the location and a name called WindowsEntServer2003BaseImage. and Click Next.
image
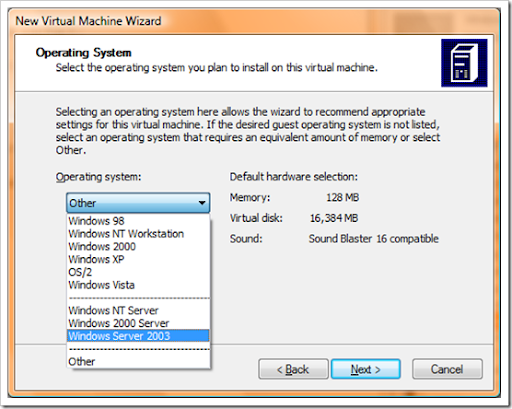
  1. 4. Select an operating system as Windows Server 2003 and Click Next.
image
  1. 5. Adjust the RAM. For this base image 1 GB or 1024 MB will suffice and Click Next.
image
  1. 6. Select A new virtual hard disk option and Click Next.
image
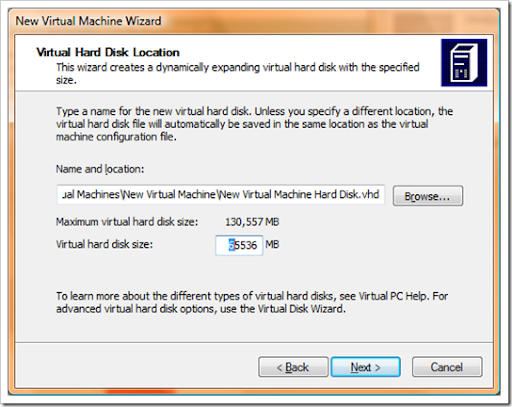
  1. 7. Create the hard disk in the same location that you selected in step 4. Adjust the virtual hard disk size 6 GB is a good start. You can resize the disk at any time and Click Next.
  2. 8. Click Next and Finish to completed the process.
Setup Loopback Adapter
Once the machine is created, add a second network adapter on the virtual machine to your host machine's Loopback Adapter.
  1. 1. Click Settings.
  2. 2. Click Networking.
  3. 3. Change the setting Number of network adapters to 2.
image
  1. Incase if you do not know how to Install Microsoft Loopback Adapter. Go to this website and follow the steps to install (How to install the Microsoft Loopback adapter in Windows XP)
  2. 4. Change the setting Adapter 2 to Microsoft Loopback Adapter.
  3. 5. Click OK.
Install an operating system on Virtual PC.
  1. 1. Virtual PC, click Start
  2. 2. If you have a Windows Server 2003 Enterprise R2 CD or DVD, insert it in your host machine now. If you have a Windows Server 2003 Enterprise R2 ISO image file, Go to menu bar, click CD, then Capture an ISO Image, and browse to the location of your Windows Server 2003 Enterprise R2 ISO image. Open the image.
  3. 3. Follow the instructions to install the server operating system.
Once everything done, then the OS need to activate and Windows Update is run to install all available service packs and patches.
Edit the HOSTS File
Since the virtual network will not going to be served by the same DNS server used by the host machine. You need to locate a virtual machine by name rather than IP address, To edit Host file follow the steps.
  1. 1. Got Run and enter C:\WINDOWS\system32\drivers\etc Right-click the HOSTS file and select Open.
  2. image
  3. 2. In the pop-up, select Notepad. Click OK.
  4. 3. Add the IP address and machine name of your virtual machine on a blank line.
  5. 5. Close the Window, and click Yes when prompted to save the changes.
Install ASP.NET 2.0 and ASP.NET 3.0
ASP.NET and Windows Workflow Foundation (WF). Both are required by SharePoint. ASP.NET 3.0 package Include above items, So follow the steps to Install.
  1. 1. Copy .NET setup file to your VPC or Share folder and access form VPC
  2. 2. When you double click it prompted to Run, Open, or Cancel, click Run or Open.
  3. 3. Prerequisites will be checked and files will be copied.
  4. 4. Agree with the terms, accept the license and click Install.
  5. 5. When installation is complete, click Exit.
Allow ASP.NET 2.0 Web Service Extensions in IIS
  1. 1. Select Start - Administrative Tools - Internet Information Services (IIS) Manager
  2. 2. In the Internet Information Services management console, expand the server name in the left pane, then select Web Service Extensions:
  3. 3. In the right pane, select ASP.NET v2.0.50727, then click the Allow button:

Install Windows SharePoint Service 3.0 SP 1
  1. 1. Copy .NET setup file to your VPC or Share folder and access form VPC
  2. 2. When you double click it prompted to Run, Open, or Cancel, click Run or Open.
  3. 4. Agree with the terms, accept the license and click Install.
  4. 5. When installation is complete, click Exit.
Back Up Your Base Image
Congratulation... Now you have created a reusable base image. Start to make a backup this image. So that you can save time when creating servers in the future.
  1. 1. Click Start and Shut down your VM. Enter a reason of "Base Image Backup".
  2. 2. Once the files are backed up, you can create a new machine by moving or copying the VHD into another folder, renaming it according to purpose
  3. 3. Prerequisites will be checked and files will be copied.
Install SharePoint on Virtual Machine
  1. 1. Virtual PC, click Start
  2. 2. If you have a SharePoint 2007 Server with Service Pack 1 CD or DVD, insert it in your host machine now. If you have a SharePoint 2007 Server with Service Pack 1 ISO image file, Go to menu bar, click CD, then Capture an ISO Image, and browse to the location of your Windows Server 2003 Enterprise R2 ISO image. Open the image.
  3. 3. Follow the instructions to install the server operating system.
  4. 4. Insert the MOSS 2007 installation media, start the installation, enter the Standard / Enterprise product key, then click the Continue button:

  1. 5. Select I accept the terms of this agreement checkbox, then click the Continue button:
  2. 6. On the Select the installation you want screen, click the Advanced button:

  1. 7. Server Type tab, select the Complete option and then click the Install Now button:

  1. 8. Once the installation is complete, select the Run the SharePoint Products and Technologies Configuration Wizard now checkbox, then click the Close button

  1. 9. Run and SharePoint Configuration Wizard
  2. 10. On the Welcome to SharePoint Products and Technologies screen, click the Next button:

  1. 11. In the services may have to be started or reset dialog box, click the Yes button:

  1. 12 On the Connect to a server farm screen, select the No, I want to create a new server farm option, then click the Next button:
  2. 13. SharePoint Setup will complete 1of10 steps to auto configure
  3. 14. Congratulation.. You  installed and configured MOSS 2007 application running inside the virtual machine.
You can also view this article at www.codeproject.com to view click here